Forum Replies Created
-
AuthorPosts
-
October 29, 2015 at 5:28 pm #10773
Y I was thinking of using my window wiper bottle so it looks stealth and already has a mounting spot as the reservoir? But lid may be an issue.
I dont think it would cope with the heat and pressure all to well. Whats everyone else think
October 29, 2015 at 5:04 pm #10765http://www.enginebasics.com/Advanced%20Engine%20Tuning/Water%20vs%20Air%20Intercooler.html
these guys are in the states have a good rep but with the dollar so low dont know if its viable
Havent heard much on these guys
http://www.axtturbo.com.au/w2a_intercoolers.html
PWR
https://www.pwr.com.au/products/intercoolers/liquid-to-air-intercoolers
https://www.pwr.com.au/portfolio/barrels-barbed-outlets
These guys did the setup on the horsepower heroes car TRYHRD
October 29, 2015 at 4:58 pm #10761oops we both posted an answer at once
Yeah water to air is a FMHE(front mount heat exchanger like a radiator), Water runs through the system, pumps the heated water front under the supercharger to the front rad where air cools the heated water as it runs through it. Then it pumps it back into the core under the blower and the dropped temp
Advantages over a2a less boost loss, disadvantages unless its extremely efficient can suffer from heak soak after a few hard passes. There is a lot to consider pump flow rates have to be right, core under blower has be to efficient as does the front mount heat exchanger.
-
This reply was modified 9 years ago by
 sands vs.
October 29, 2015 at 4:45 pm #10755I still have a Harrop Reservoir and the Bosch Pump if it’s of any use? (big one on the left)

Id be using something decent like this both look great and decent brand. The yella terra pumps failed and were noisy. The res had a base that screwed on that constantly leaked.
October 29, 2015 at 4:43 pm #10754When I Looked into it pwr could make a front mount to any size and passes you wanted at a cost. But quality wise and costumer service they were spot on. They can do the calculations for you as well based on hp/boost etc
“”Basically the way we know that we are more efficient than a core straight off the bat is that our tube design is the best in the world, the tube we do not have different tubes that we use for Nascar or Formula 1 compared to what we use in our everyday cores. These tubes are typically 8-10% more efficient straight from the get go””
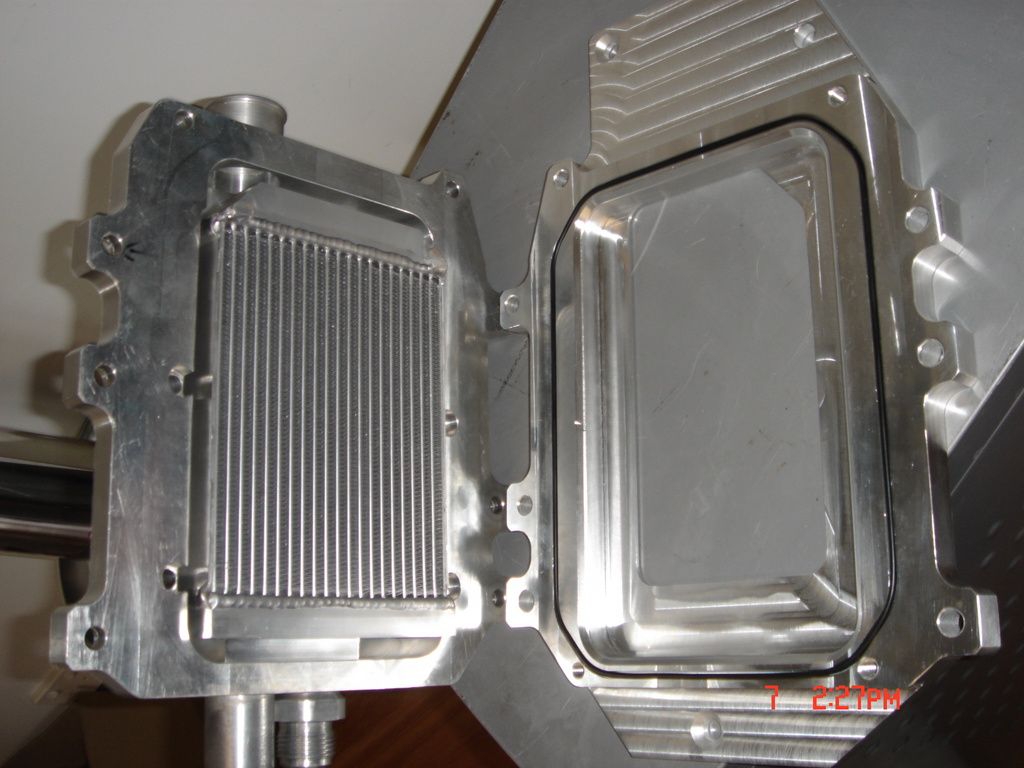
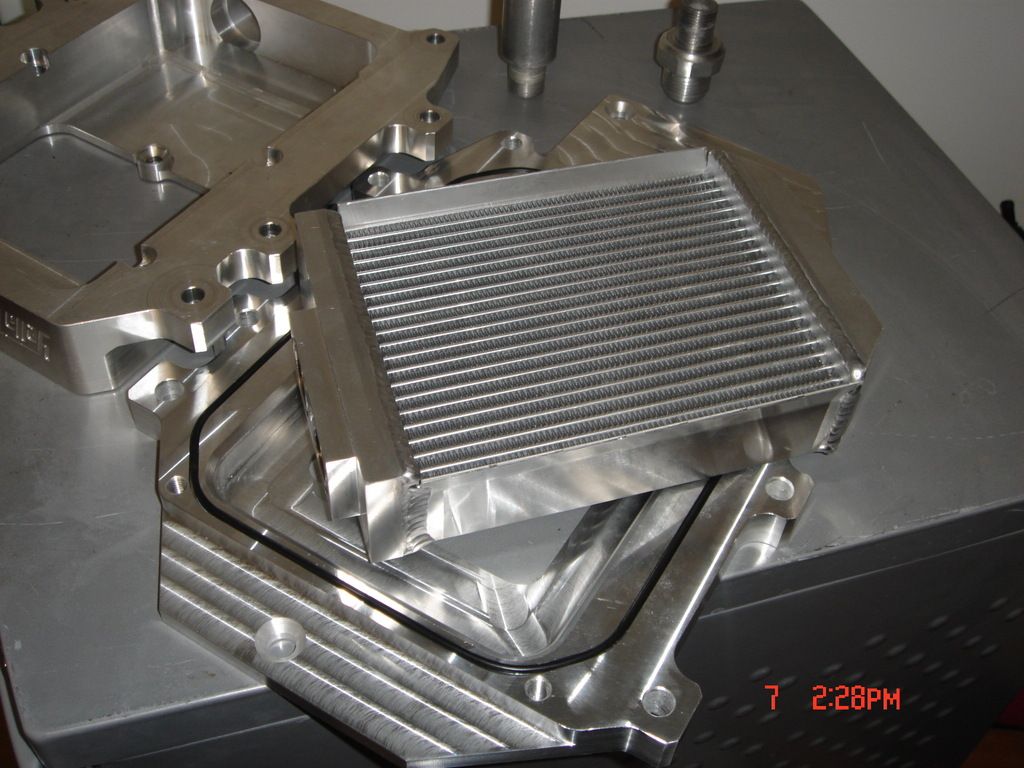
For example with the yella terra core under the blower they used a transmission cooler and it was fairly average setup. So they custom made these high efficiency cores to suit the housing.. Fins per inch also a consideration, as with fin and core type
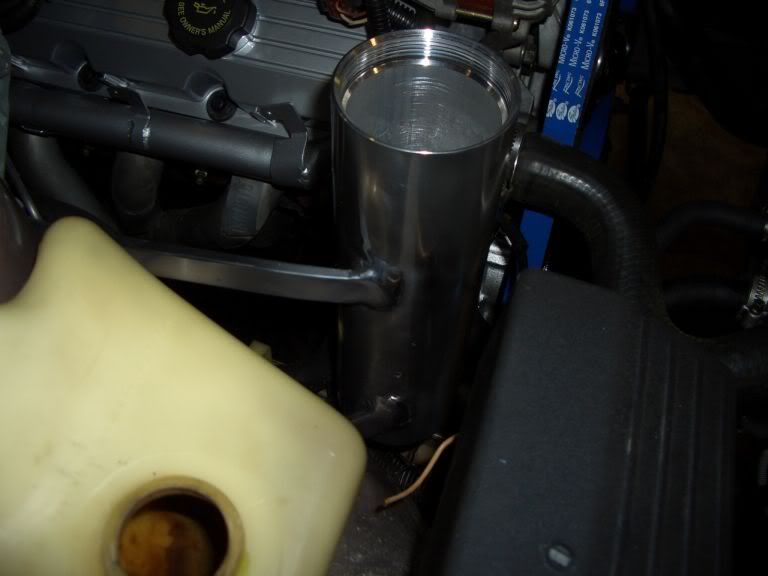
October 29, 2015 at 4:27 pm #10743Ok so thats yella terra their actual res they sell with their w2a inter cooler kits. Which im pretty sure you could buy separately. But they had issues with sealing and something else memory escapes me. etc I would just run a generic there is some neat ones on ebay. Again we had to make our own custom mounds and remove existing mounts. But the holes in the body were all their on the strut towers
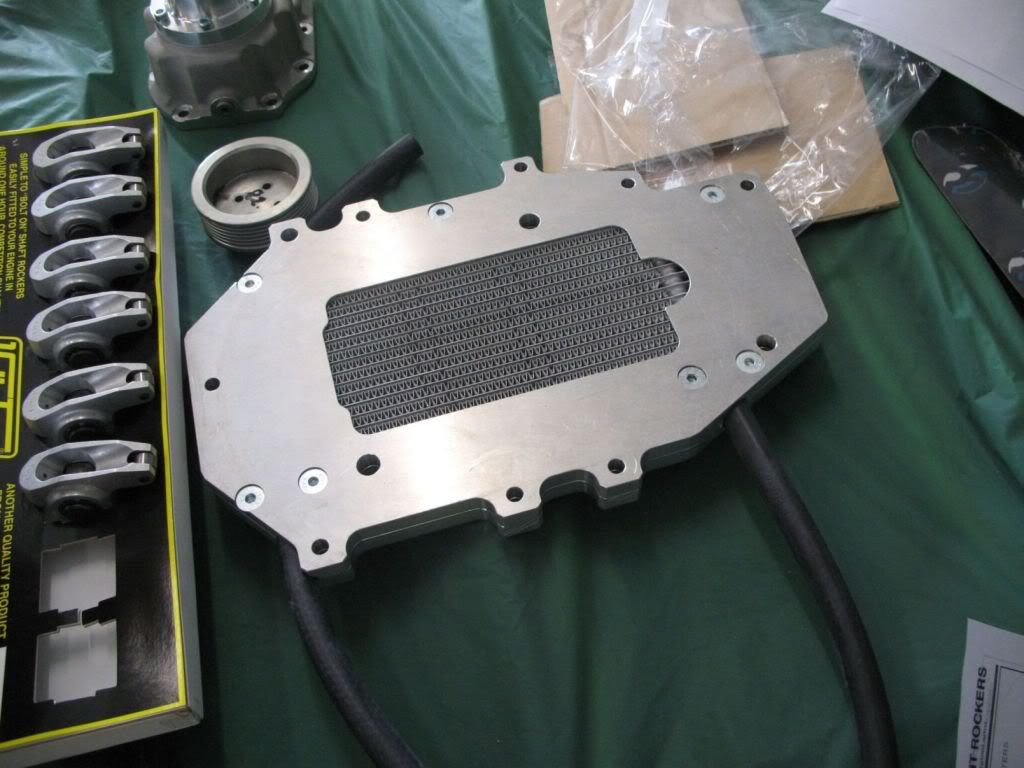
It fed via a pump into this on my charged v6. But no longer intercooled decided to go built engine with cam etc. The yella terra kits had many reliability and performance/quality issues and I wanted to go full sleeper. They later went a larger front heat exchanger too and played around with amount of pass/thickness in an attempt to make it more efficient.
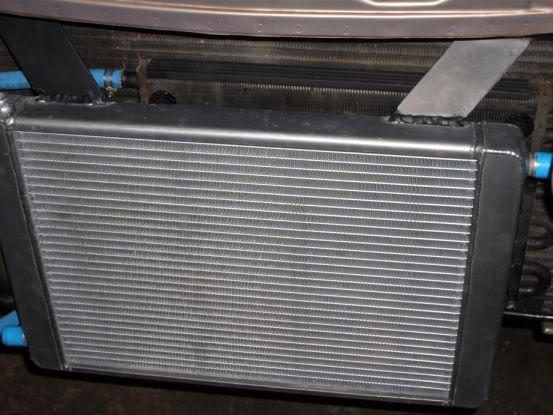
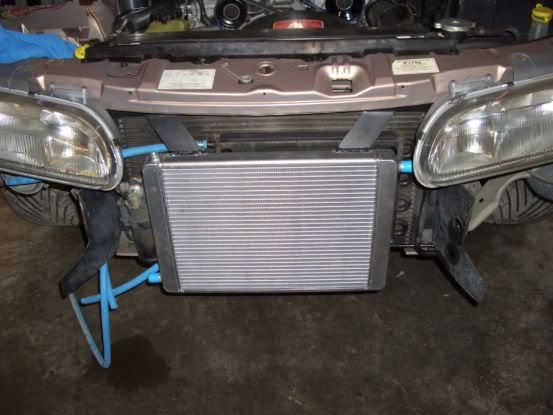
October 29, 2015 at 4:13 pm #10735TOP FMHE: Ok so its pwr heat exchanger smallish that yella terra sold. We cut off mounting tabs and welded on alloy straps on few angles(dont have pics sorry) so that it mounted up behind the headlight mounting bolts from memory.
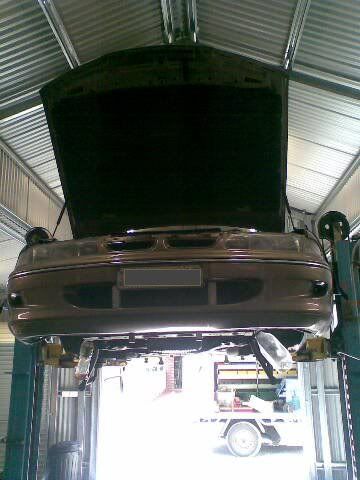
BASE FMHE In the holes that the plastic air deflector goes put a nut up in there, there was existing holes or you could use a riv nut. Thats how we mounted the bast no holes cut and bar intact with full ac . So with your extra space with no ac gear be much better.
Click on this open it up you can see the hook mounts hanging down as its not mounted yet
The res was mounted into existing holes in the bay.
Sorry thats all I have it was fitted many years and im relying on memory and the only pics I have
-
This reply was modified 9 years ago by
 sands vs.
-
This reply was modified 9 years ago by
 sands vs.
-
This reply was modified 9 years ago by
 sands vs.
-
This reply was modified 9 years ago by
 sands vs.
-
This reply was modified 9 years ago by
 sands vs.
-
This reply was modified 9 years ago by
 sands vs.
-
This reply was modified 9 years ago by
 sands vs.
October 29, 2015 at 4:02 pm #10732Nice very keen to watch this great build…
I can up pics of how I mounted my front mount w2a with no holes and reserviour if you want may help?
-
This reply was modified 9 years ago by
 sands vs.
October 29, 2015 at 3:58 pm #10729Looking really good. So why does the final tune need to be altered is it to suit new gearbox/headers or because it doesn’t have to be a strict now?
Can you put it in D now or is it fully manualised?
-
This reply was modified 9 years ago by
 sands vs.
October 29, 2015 at 3:52 pm #10728I mean my mate they wouldnt pass it when holes were cut in the front for cooler pipes and they were quite picky about mounting methods etc. Suppose depends on the engineer
October 29, 2015 at 2:22 pm #10723Any progress with the glide?
Whats going to happen with the original gearbox out of this now?
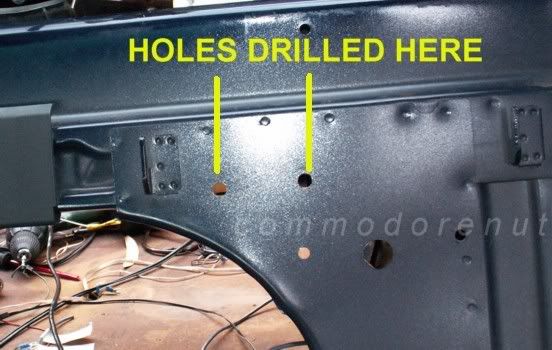
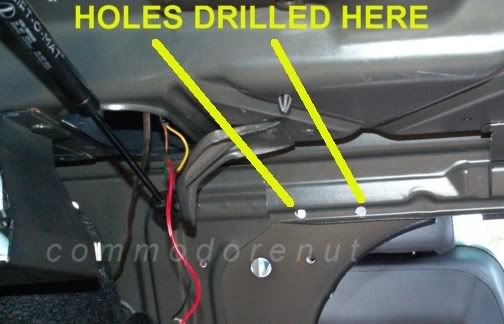
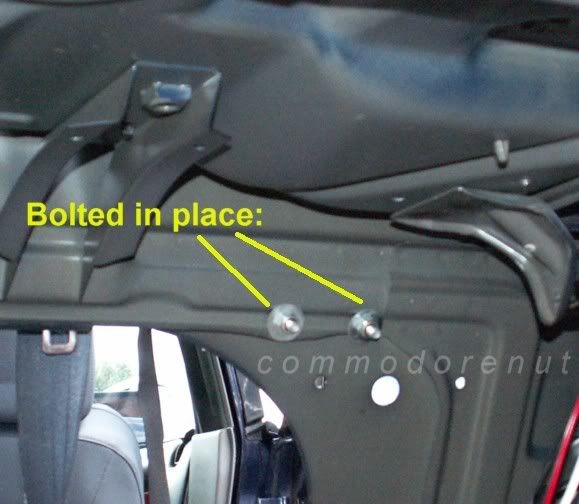
October 29, 2015 at 1:00 pm #10713You will notice the bolt holes are drilled into the reinforced part of the panel too for strength.
In a severe accident the head goes back with force into the head rest/restraint. If they are not secured the inertia of the head against it can be enough to push the metal pins into someones back and impale them that’s why they need to be secured. It could act as a projectile as well. Just my 2 cents.
We were also looking at welding the bolt to the plate makes removal later much easier. So you can undo nut from the boot making much easier to remove the seat
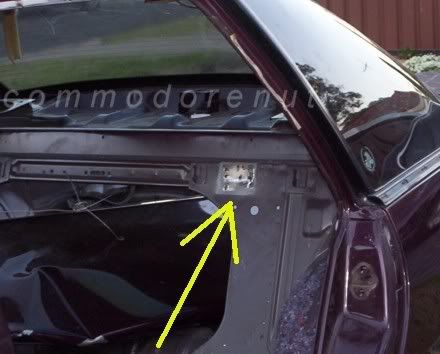
October 29, 2015 at 12:47 pm #10709They have brackets mounted to the rear bulkhead. They are the same as the brackets used in the Caprice (except the Caprice ones are spot-welded into place).
Granges & other models fitted with the rear seats that have the seperate headrests are like this.
The brackets go in first, then the seats go in, then the headrest retaining tubes are fitted down into place before finally inserting the headrest.
I would recommend not fitting the circlips into the top of the tubes! The tubes are the same as what is under the trim on the front seats too – same piece from VN-VS.I put the rear seats out of a VS2 Grange into a mate’s VR (redid the side wings to suit the sedan). We got the brackets from the donor car, along with the trim.
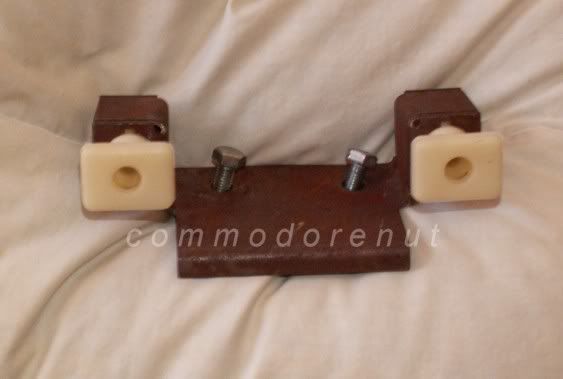
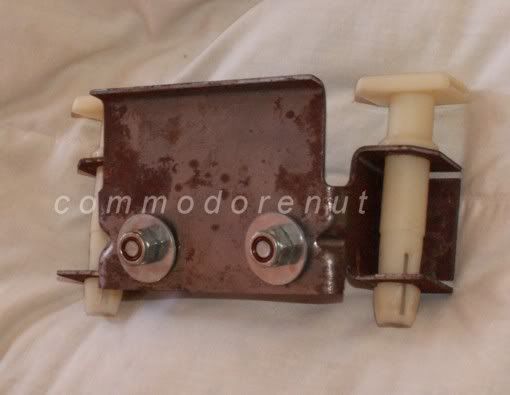
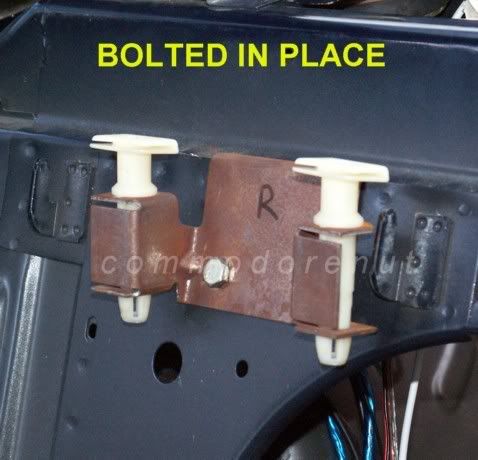
Here’s pics of the brackets:
The rolled over edge on the top allows you to locate it on the rear bulkhead, but you still have to align them side-to-side.
The holes go through the pressed ridge in the boot side of the bulkhead, as shown in the 2 pics below:
Bolted up in place. The washers on the back allow you to bolt them down securely, and still tighten the nuts up.
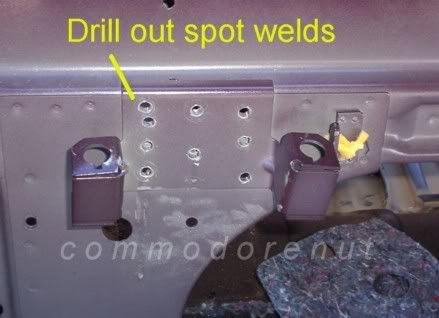
You’ll have buckleys of finding the HSV ones. They are the ‘raw’ ones before they are spot welded into the Caprice. So the next best bet is to source them from a VR/VS Caprice.
Here’s a donor car we got another set from. You can see where they were in one pic, and the other pic shows the swiss cheese job – drilling out all the spot welds to release them off the bulkhead.
October 29, 2015 at 12:17 pm #10707It’s just a BW which I’ll cut down and build with full spool, 31 spline and 3.7 gearing.
You reckon it will hold up?
Also might want to consult the engineer before you go cutting anything for the heat ex changer just incase it presents an issue.
-
This reply was modified 9 years ago by
 sands vs.
October 29, 2015 at 9:07 am #10704Really nice car, great transformation… Missing the holden badge??
October 28, 2015 at 5:12 pm #10700Have to see them on the car hopefully they suit it
October 28, 2015 at 2:21 pm #10695October 28, 2015 at 9:09 am #10679Today End! Went and borrowed a Tech2 from a Mate this morning on my way back my Solder Sucker had arrived so I was able to repair my EFI-Live screen, found a couple of issues in my tune file corrected them and while it was a little better the Throttle disconnect was still happening, I was able to watch what it was doing and when on the EFI-Live screen in real time and noticed it was only if I had the brakes on… “Brake Torque Management” Closes the throttle kills fuel and spark if both pedals are used… I’m a left foot braker so it bit me badly as I was probably trail braking at the track, what makes it worse is there’s a delay timer, the longer it see’s it happening the longer it takes to restore throttle control… DOH Temp Gumby “Fix” for now is to adjust the pedal switch so you need a lot of pressure before the ECU see’s it, this will allow me to stall it up a bit on the start line and light trail braking, tested it out in the Shed, had 3 wheels spinning before I ran out of Shed!
Whats it going to take to actually fix it rather than temporary?
October 27, 2015 at 1:39 pm #10659Looks neat who did the trimming?
October 27, 2015 at 11:58 am #10656Can you make the whole conversion sound really hard and expensive for me mate so I dont get tempted to do the same ha ha
-
This reply was modified 9 years ago by
-
AuthorPosts

