Forum Replies Created
-
AuthorPosts
-
July 19, 2016 at 4:44 pm #18585
Be aware that with mine, to assist in getting the geometry right, I basically used new metal over the top of cut down existing metal to make a doubler plate. This also helps with the tearing of the mounting holes (which you’ve experienced also). However it means that the splined camber bolts are just barely long enough to engage the nut the full thread width. It’s not ideal but now part of my maintenance inspection.
Nice work, good to see someone else that’s had a go, Its been about 4000km since I done mine and it’s easily the best thing you can do to the IRS, for grip and tyre wear. Haven’t gone back to the strip yet though.
Im using superpro bushes which have the 2 bolts and locknuts and I still have plenty of thread to lock up, they don’t come loose but I check them as maintenance.
November 24, 2015 at 8:38 pm #11652Yeah i’ve got a VP Calais (IRS) running the Superpro 4 point Adjustable bushes inner and outer but it still seems to run a noticeable bit of negative camber so was interested in how effective the weld in boxes are or if they’ll even suit the VP.
They will suit as the subframe is basically the same, Its not an easy job to work out the plates as the mount is angled/slanted slightly and welding the boxes on can be tight even with a flex head tig torch.
November 24, 2015 at 7:33 pm #11648So these cradle extension boxes are they purely for running coilovers/tubed control arms or could u weld them in and have the rest stock just lowered to help with camber?
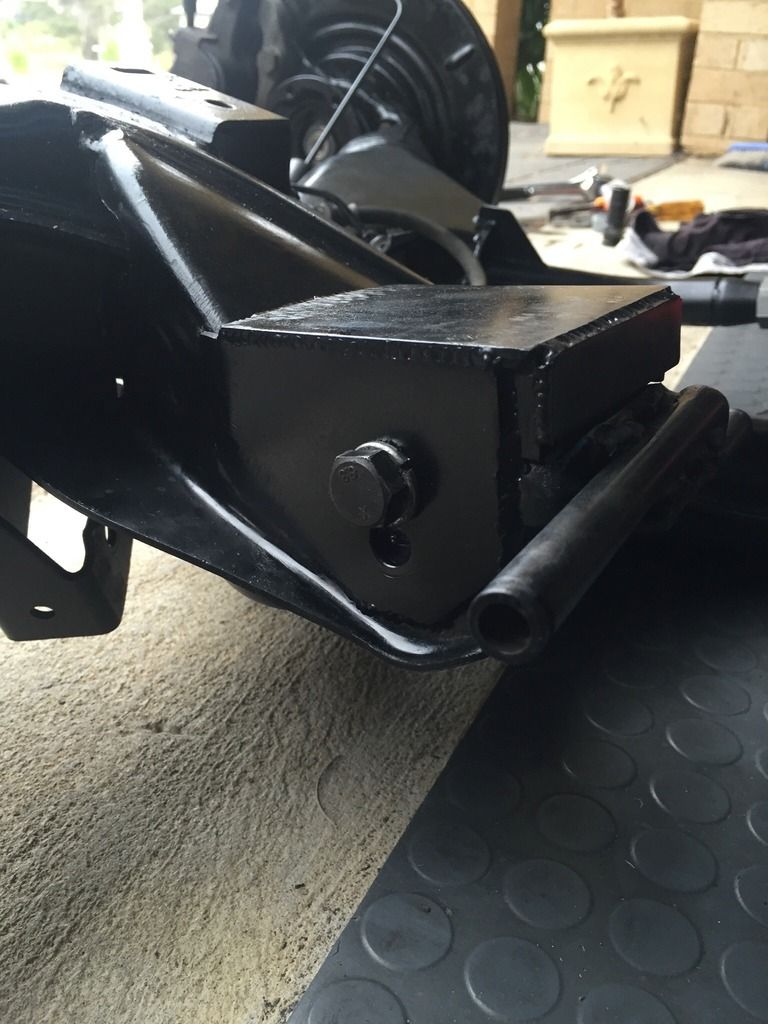
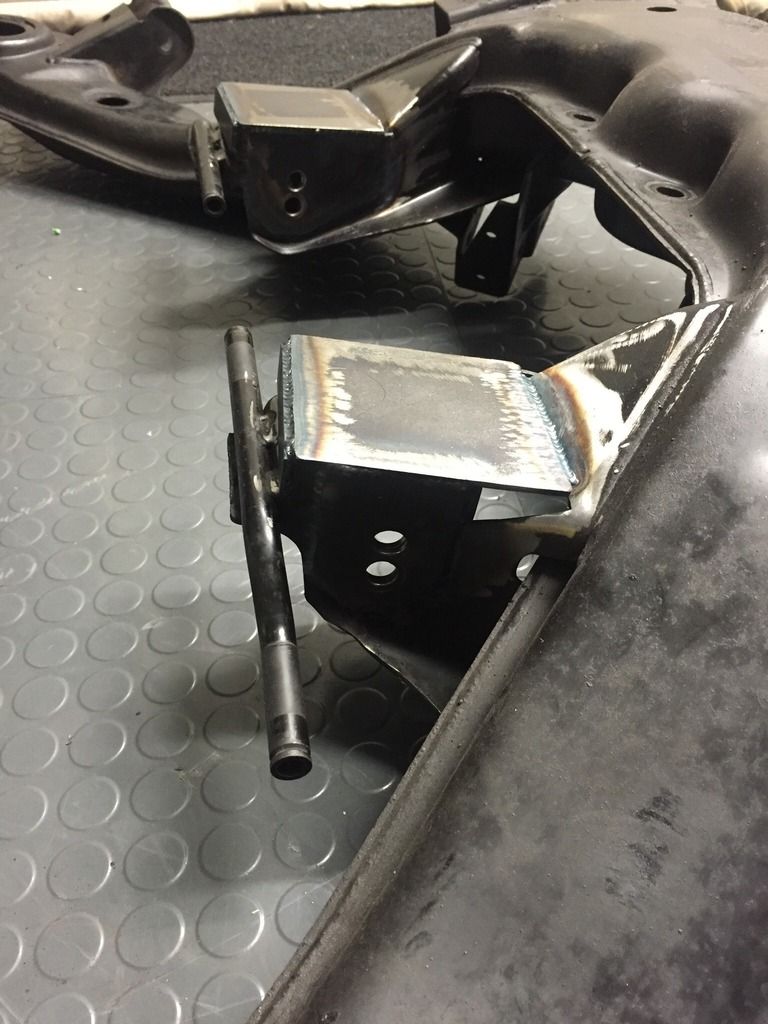
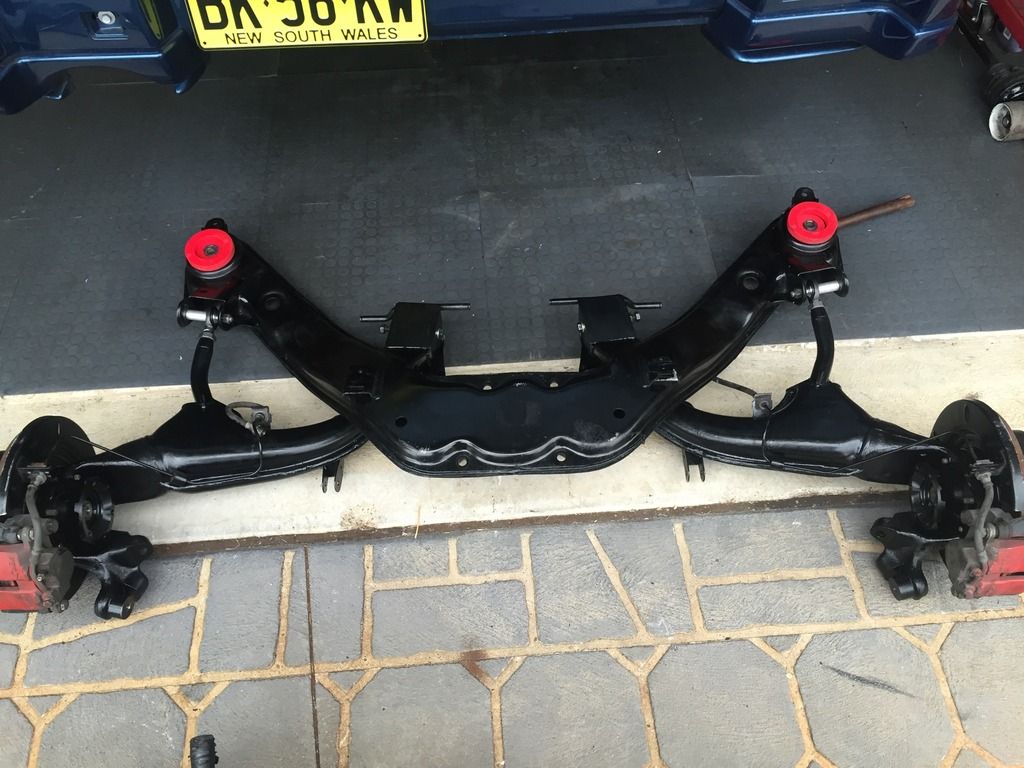
The boxes (first and second pic) can be run on standard rear end.
I used to run the adjustable bushes on the toe and camber (super pro), I couldn’t get the adjustment that I needed to not scrub tyres, I am still running the adjustable bush on the camber side with the additional hole and if I want I can give it positive camber, the adjustment now is much better.
My ute is on 235/40/18 and measures 630mm from centre of guard lip to floor, so it’s low but not dragging its arse lol.
I tube the toe side as I will be tubbing to the chassis rail over Xmas, that way I can still be low and use the 28×9 full slick without worrying about scrubbing, plus the rod end gives more adjustment/feel to the rear.
November 19, 2015 at 8:18 pm #11464Always seems to be out by 2 degrees.
I always carry spares to the track, I have Porsche 930 cv’s now which are holding up well, stubs are twisting though lol.Give us a heads up next time you are deciding to go to Sydney dragway, I’m due to run again.
-
This reply was modified 9 years, 1 month ago by
Brad.
November 18, 2015 at 8:57 pm #11450Nice build!
Surprised you haven’t smashed a cv yet although autos/radials are more forgiving.
That cam has a decent split, should sound real good, I hope you dialed the cam in as every comp cam I’ve installed (3 of them) was either retard or advance at least a degree or 2.
+1 for the filter removal it makes a difference, just make sure you leave the otr on as removing it you can loose 7rwkw, I did a back to back test on the dyno, on 2 seperate cars, I guess it’s due to the airflow being disrupted by the radiator when otr is removed.
Keen to see how much mph goes up when you lean off when on nitrous.
November 18, 2015 at 8:02 pm #11449Thanks for the nice comments fellas.
November 18, 2015 at 5:37 pm #11438Curious what kind of welder/rods you used for that?
I have a digital ac/dc tig, filler rods are Cigweld high test rt60 using 2.4mm 2% thoriated tungsten sharpened to a long pointed tip, I use a foot pedal so set max amps to 110.
November 18, 2015 at 3:39 pm #11433Far out someone knows how to weld there………..
Thanks mate.
You sir are a legend!!!
No problems.
I have all the measurements and most stuff drawn on cad, so if anyone needs info just ask.
November 18, 2015 at 1:04 pm #11417November 18, 2015 at 5:04 am #11401Do you know if the same thing can be done with the VP/S subframes
Can’t see why not, the subframe is similar, but the control arms are different.
Not sure how much clearance from the mount to the body the vp/s has though. You will need 50mm from the centre of the original mount hole to the body at the lowest point minimum.
November 17, 2015 at 8:19 pm #11396Looks good but it looks like you only linked thumbnails. Maybe someone more in tune with this forum can tell you how to link photos properly. I assume thats installed in your VU?
Yeah sorry posting off the phone so bit limited and rushed.
Yep this is in the VU, I’ve used a VY sedan subframe and control arms as you can get the shocks more upright with the extensions then the ute control arms, also you can use toe rods which I’ve made out of chromoly with rod ends.
November 16, 2015 at 8:54 pm #11362Sorry for the delay, ive attached some pictures.
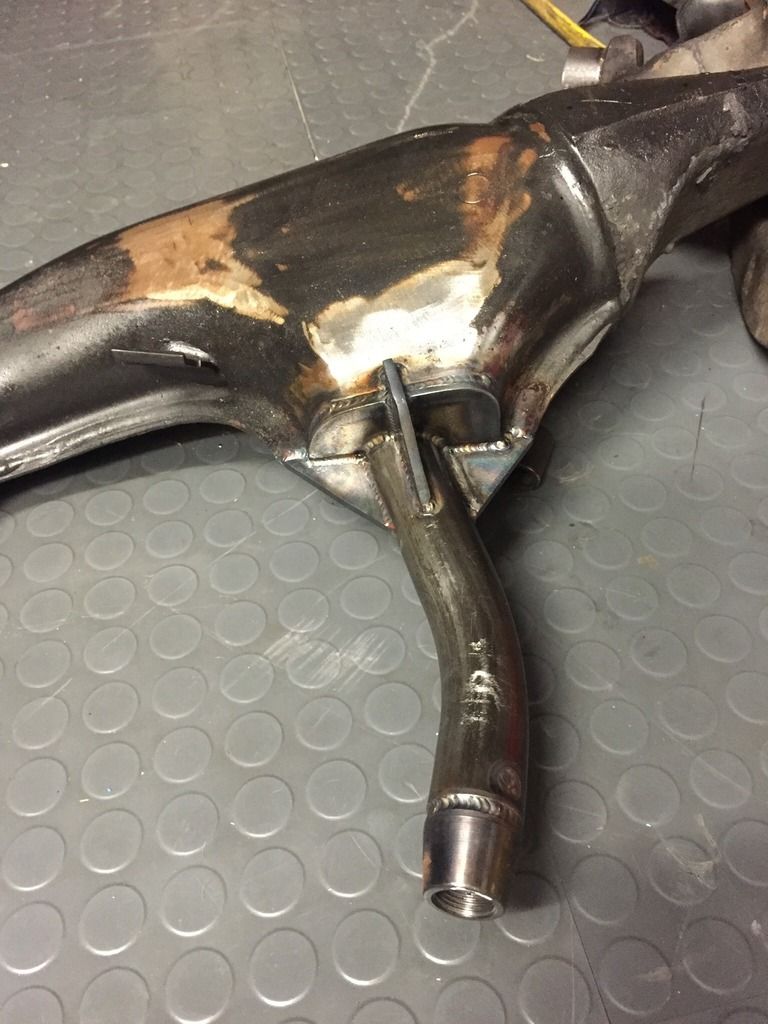
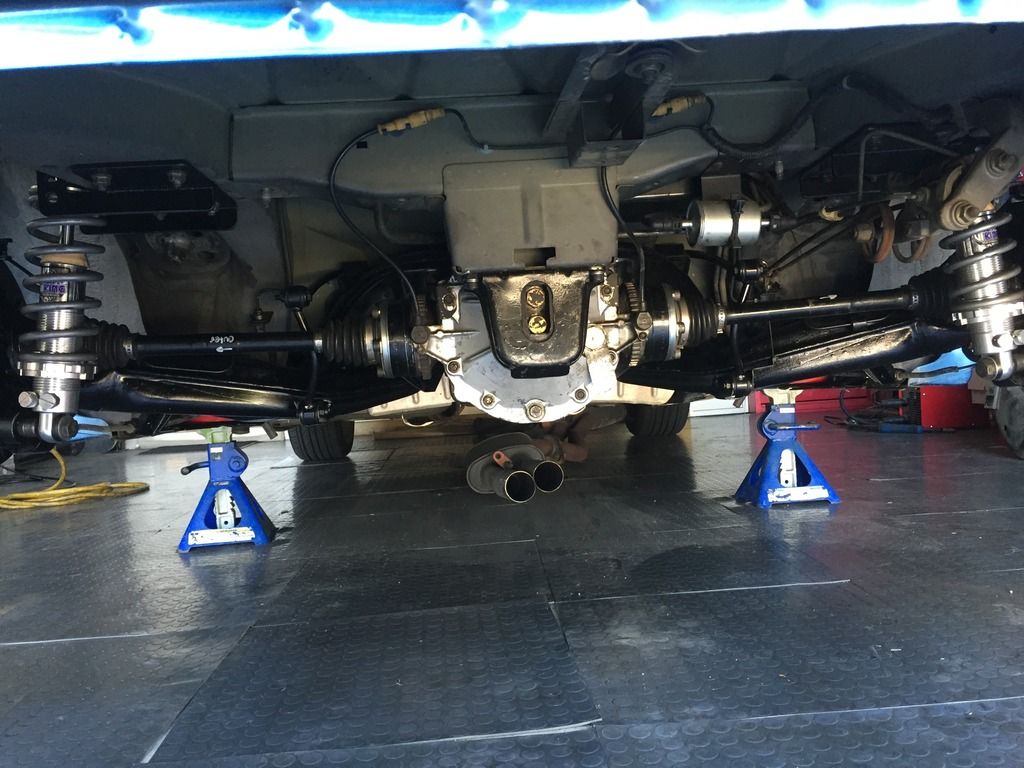
Lower mount for coilovers has been extended with 4340 chromoly, it has been welded to the original mount and tapped for longer m14 bolt. This is in a ute so the upper mount bolts in place of the factory shock mount.
The car feels heaps better than the original setup and the shock/spring is now behind the diff so helps with weight transfer.
November 9, 2015 at 3:39 pm #11066I have modified the camber mounting point, made boxed section and cut the roof out of the standard mount.
Made boxed section with extra hole 20mm higher, I get basically zero camber at a height of 625mm (measuring floor to lip).
Also it’s a good idea to have subframe bushes that are either solid or hard urethane as the top of the box will sit very close to the body.
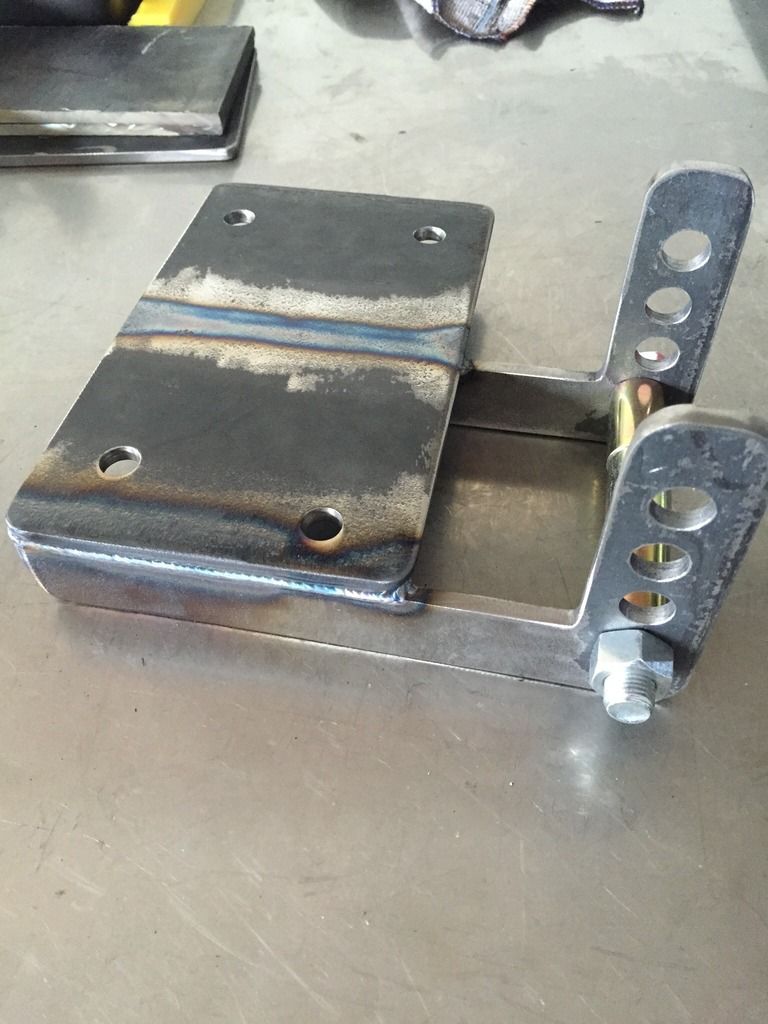
I also modified the control arm with 4130 chromoly tube arm on the toe section and used a heim joint. Also made coilover bracket for double adjustable Viking/qa1/strange coilovers.
-
This reply was modified 9 years, 1 month ago by
-
AuthorPosts

 [/url]
 [/url]
 [/url]
 [/url]
 [/url]
 [/url]