Home›Forums›Technical – General›Engine Conversions & Engineering›VR/VS LS Engine Conversion General Information
This topic contains 97 replies, has 19 voices, and was last updated by Marc 4 years, 10 months ago.
-
AuthorPosts
-
February 18, 2015 at 10:54 pm #608

VRSenator065Participant- Adelaide SA
- VR Senator LSx454 1960 Kombi (project) 1921 Nash Hot Rod (future project)
View build HERE
Posts: 5 777
Seems to be more and more people asking about fitting the LS engine into the VR & VS Commodore. As I am pretty well through a three year build, and have learned a lot along the way I thought I would start a dedicated thread on it. Below is the info I know so far, anyone else out there who has done this conversion, feel free to correct me or add to this with a post.
All conversions are subtly different, the kind of car you want at the end will change many things. NA vs FI, auto vs manual, mild vs. wild will all change what’s needed. The advantage of this conversion is you end up with an engine that has heaps of potential to upgrade down the track.
Conversion Cost
This totally depends on what sort of build it is. General consensus seems to be it can be done for as low as $7k if you plan on buying a second hand LS1, auto, drop it in and go with minimal upgrades. But its not hard to triple that number if you start upgrading brakes, diff, drive shafts, fuel system etc. What ever you budget you will be surprised how many other small things you need to do and buy.Engineering
Australia does not currently have uniform enforced rules relating to engine swaps common to every state and territory. A number of states have adopted the suggested guidelines. Many have specific weight vs. capacity limits. There is no set minimum clearance distance for engineering. My engineer has no set number, it depends on what the part is and how far its likely to move. I strongly suggest before purchasing anything for this conversion you track down an approved engineer, and find out what exactly is required for your specific build. As a ball park, my engineer is charging me $3,000 to fully engineer an LSx454 into a VR with many many modifications, others will be way cheaper (as low as $500) if its a straight 5L to LS1 swap only.Engine Mounts
You will need specific engine mounts, there are at least two that I know of that are a simple bolt in mount. Tuff Mounts are a complete bolt in made for performance/race style applications, CRS make adapters to run stock OE engine mounts, but they have a bad rep for chopping out quickly but will work well for a mild upgrade/swap. Just for info I have ended up using Tuff mounts for the engine mounts, and a regular rubber rear trans mount as a good compromise between longevity and harshness.Front Cross K Member & Sump
You will need a forward sump. A VY is best the pick if you can get one, as they have a little bit nicer baffling. BUT a standard LS sump will not clear a standard VR/S front K member as it hits at the back corners. You have three options that I know of. You can notch out the corners of the K member where it fouls, then weld in a strengthening strip; or you can trim the side plates plate and box it in (thst what i did); or you can trim back the corners of the actual sump, then tig weld it up.Engine ECU & Loom
Any LS style later ECU will work for most applications. They are physically big, and won’t fit in the standard passenger kick panel unless you trim the fins. Most guys mount them high up on the passenger foot well. I mounted mine in my glove box. Plug and play looms are available from a few different people just Google it.Headers
Pacemaker conversion headers (#PH5345) are the go (approx $750), unless you can afford a custom set ($2k). Lots of people have trouble with the fit of the CRS ones. It’s very close whatever you do around the steering shaft. Some people move the rack over, but you may have trouble being approved, if you can live with it going to a manual rack gives more clearance.Update: I decided to swap to larger primary 4 into 1 headers when I changed to the glide, as even though I made 508 rwhp with the Pacemakers, but they were choking it over 6k rpm. Have posted at the end of this thread how I went about fitting them.
Engine Clearance
Its tight, it just is. You will need to get the alternator as close to the block as possible, even so you will have between 8 and 10mm clearance. Be wary of people quoting a minimum distance for engineering. My engineer has no set number, it depends on what it is and how far its likely to move. The VR chassis rails are narrower than a vt onwards, there is very little room. I used a billet mount, then opened the mount holes to allow me to move the alternator across as much as possible. Also the coil pack closest to the brake booster if mounted in the standard spot will hit the booster. Its easy to move slightly or relocate them completely. The headers on both sides will be close, and there is very little clearance around the headers to starter. Anything you can do whilst the engine is out rather than in the bay is worth it.Fuel System
You can get by with a corvette fuel pressure regulator down near the tank. If it’s stock you can get by with stock fuel lines, some people couple the feed and return together and use a y piece to get more flow, or run hard lines like I did. Opinions on this vary, I believe a full return system with regulator right at the end of the fuel rails is the ultimate system.Starter Swap
You will need the CRS starter swap kit. The only way I know of not needing it is if you are going turbo and the manifold comes forward. Again though it’s very tight whatever you do down there. Many have tried to avoid the starter swap kit, to date I have not seen it done successfully.Automatic Gearbox
A 4l60e or 4l65e auto will do the job, the main difference between the two is the planetaries and stronger case of the 65. Both suffer from failure where the input shaft is a press fit into the input drum, (and other shortcomings) if it’s open upgrading the shell is worthwhile, to a beast or Sonnax smart shell. There’s a lot you can do if it’s open, but a stockie will hold up if you have some mechanical sympathy.IRS Rear Sub Frame
The rear sub frame on a VR and VS is a known weak spot, even with a standard 5L. Check it for cracks, reinforcing it is relatively easy to do and will give you piece of mind.Other Non-Essential Upgrades
-Some guys run stock half shafts and get by, others blow cv’s a lot, the ultimate is G force, cost a small fortune but are pretty much unbreakable.
-G Force make a 9″ diff conversion that will work with a VR but is extremely expensive (approx $10k). Harrop make a 12 Bolt, which is a 8.9″ crown wheel, essentially the GM version of a 9″ (approx $5k). Its a simple bolt in swap. A built M80 (approx $2.5k) will do for straight conversions
-Brakes in a standard VR are just bloody awful. Anybody contemplating this conversion, should at least look around for a bigger set off a HSV, a VT upgrade used to be popular, but I hear a VE conversion is now the go.
-Radiator hoses are easily made up by using one of those flexible universal hoses, or going to a local auto store and just using what fits.
-A stock 5l radiator in good nick will work, if you go custom you can get the inlets and outlet put where you want.It’s a great conversion and opens up a world of horsepower once it’s done. It’s not particularly hard or expensive, and can be done in your own shed with hand tools. But it all depends on what exactly you want at the end. I know of someone who did the conversion in a couple of week ends on about $7k, but its not hard to chew up $25k if you go for all the bells and whistles.
-
This topic was modified 9 years, 10 months ago by
 VRSenator065.
-
This topic was modified 9 years, 9 months ago by
 VRSenator065.
-
This topic was modified 9 years, 9 months ago by
 VRSenator065.
-
This topic was modified 9 years, 9 months ago by
 VRSenator065.
-
This topic was modified 7 years, 8 months ago by
 VRSenator065.
March 3, 2015 at 11:38 am #1654
VRSenator065Participant- Adelaide SA
- VR Senator LSx454 1960 Kombi (project) 1921 Nash Hot Rod (future project)
View build HERE
Posts: 5 777
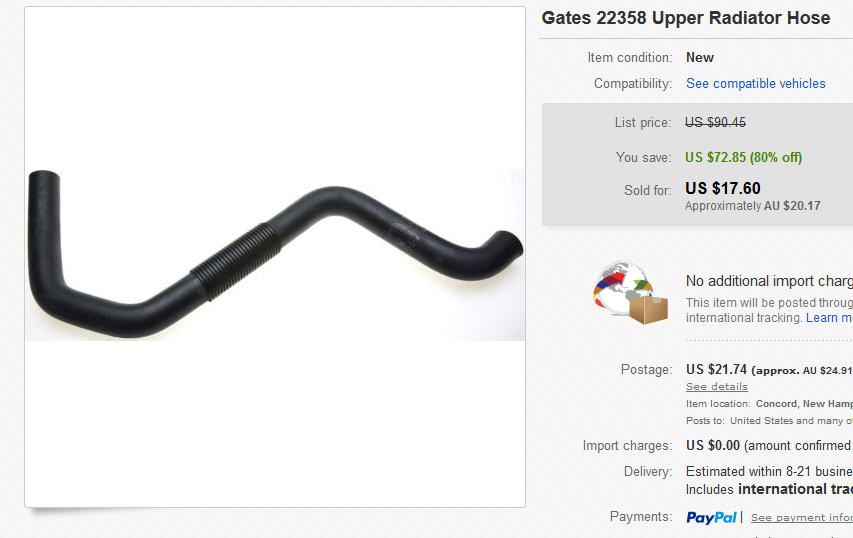
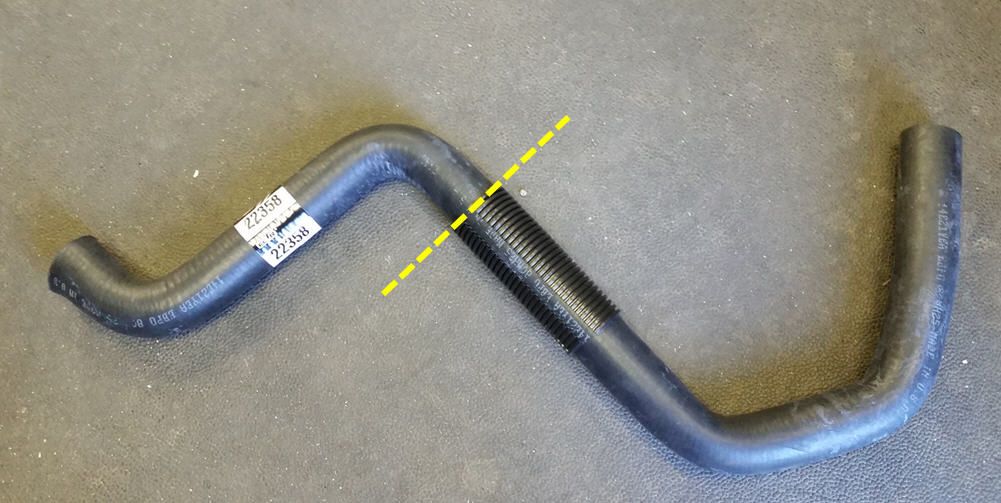
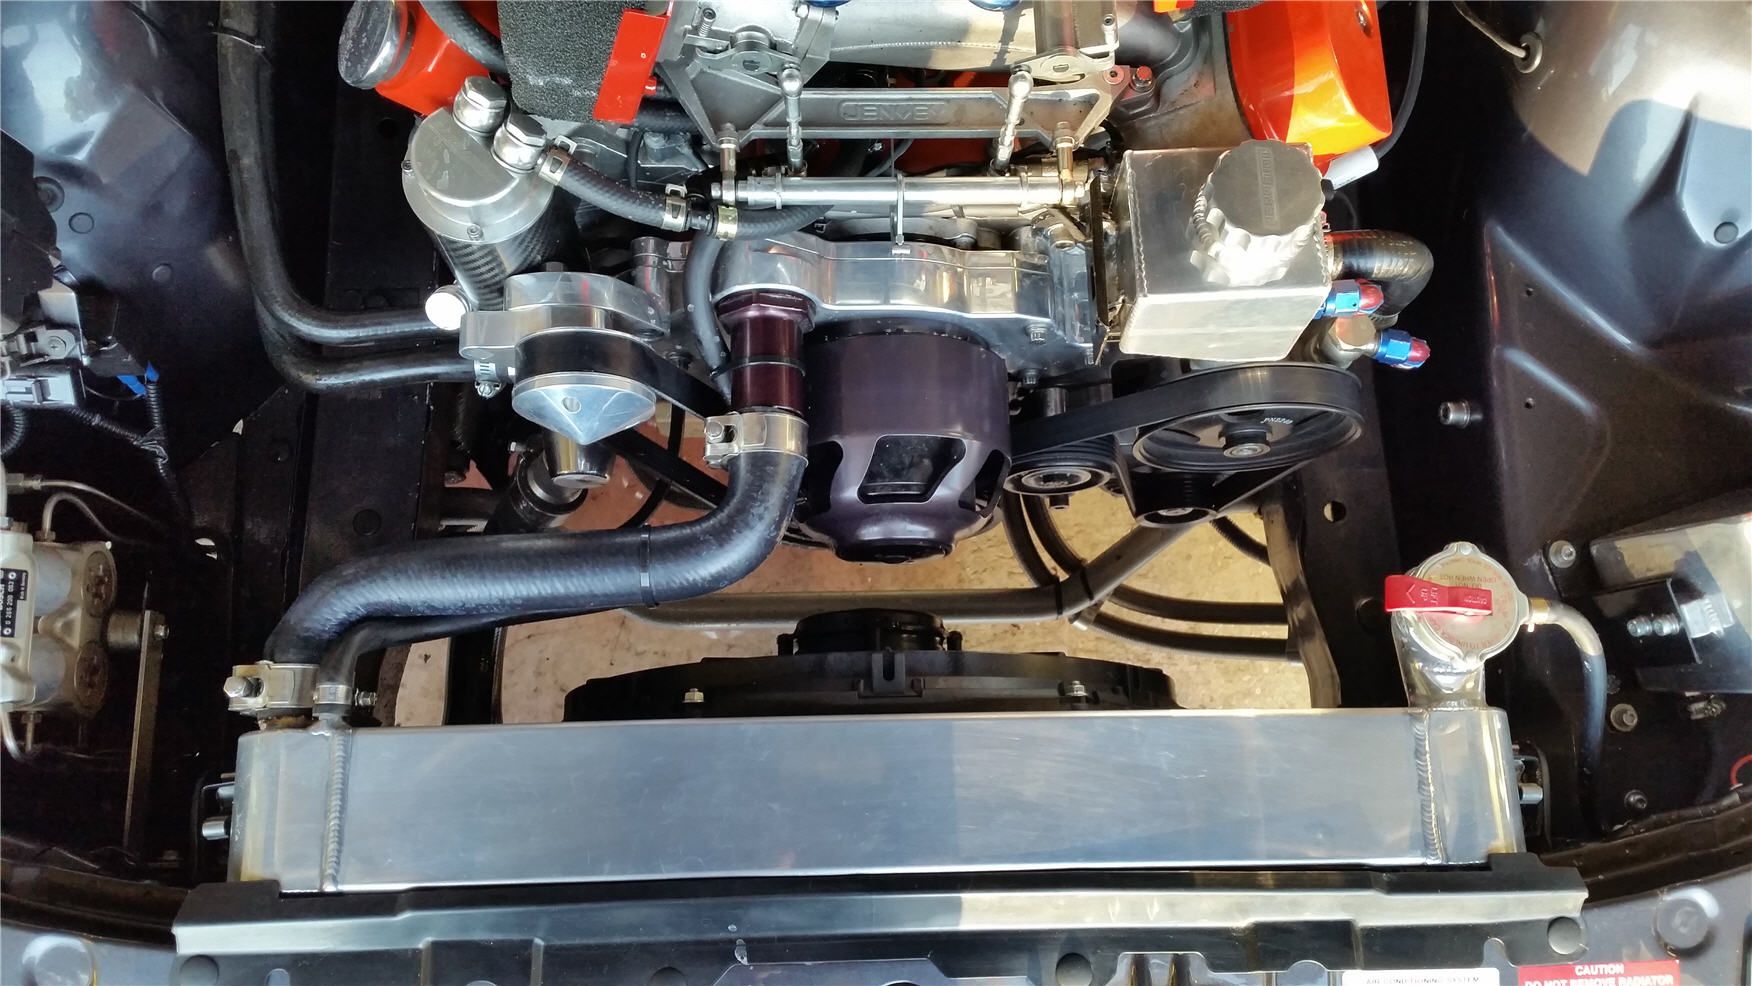
If anyone has a set up like mine, so that’s a drivers side radiator top entry then there is a radiator hose you can buy off the shelf that will work. It fits a Cadillac Escalade, as well as a 2500 pick up. The Gates part number is 22358, you just trim the bit you don’t need and are left with the perfect Z section. Here’s a couple of pics.
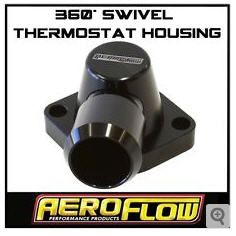
For the bottom hose, if you use an Aeroflow swivel thermostat housing, you can orientate it straight down so you can use an off the shelf 90 degree bend.
March 26, 2015 at 9:16 am #3395March 27, 2015 at 8:05 pm #3509http://s1077.photobucket.com/user/dave_moni/library/vk
Pics of mods I did to my LS sump for fitment into VK
March 31, 2015 at 5:18 pm #3702
SSEN8R VS #1081Participant- Brisbane, North Side
- \'97 VS II HSV Senator 185i
View build HERE
Posts: 227
Gary, do you still have power steering and air conditioning? Cruise Control? Any else had to go?
My build thread - http://www.commodoresplus.com.au/forums/topic/vs-ii-senator-185i-1081/
My track day thread - http://www.commodoresplus.com.au/forums/topic/lakeside-track-sprint-day-second-go/
My VS brake upgrade thread - http://www.commodoresplus.com.au/forums/topic/vs-brake-upgrades/March 31, 2015 at 7:14 pm #3706
VRSenator065Participant- Adelaide SA
- VR Senator LSx454 1960 Kombi (project) 1921 Nash Hot Rod (future project)
View build HERE
Posts: 5 777
Still have power steering, actually planning on changing to an electric Astra power steering pump one day so I can get that out of the bay. Still have the heater, at this stage haven’t bothered with air con compressor, although may, particularly if I decide to drive it over for the nats etc, think that straight forward, cruise didn’t bother, not sure I could tbh with my ITb set up, but if it was a regular single throttle body intake should be simple enough I think. Mine sort of took a left turn with the 454, when I strated with the LS3 I was going to have all that
 April 1, 2015 at 10:31 am #3740
I’m sure someone could integrate a cruise into your ITB Gary
Thats a must with my next combo. Makes life a lot easier on the hwy. ESP with a large converter.
April 1, 2015 at 11:39 am #3741
VRSenator065Participant- Adelaide SA
- VR Senator LSx454 1960 Kombi (project) 1921 Nash Hot Rod (future project)
View build HERE
Posts: 5 777
I guess anything could be done Cav but really that’s low on the priority list right now. Would be hard to make it nice and stealthy too, as the cable comes to the front on the engine. Could maybe get something that sat under the trumpets, but as i say other stuff I want to spend the time on first.
April 12, 2015 at 9:12 am #4522has anyone used the fbw throttle? im building a ls swapped vb and just found a complete cammed l76 for the right price .. is it just a matter of mounting the electric pedal and loom or can u run cable throttle body and change it in the ecu
April 12, 2015 at 10:19 am #4524I’ve got FBW in my 2005 VZ SS Ute.
I cannot stand it. Would rather cable any day of the week. Also with fbw u need the correct pedal assembly and associated sensors plus a computer that’s eligible to run it. Buy the motor and just conver to cable. That would be SO much easier
April 12, 2015 at 10:21 am #4525
VRSenator065Participant- Adelaide SA
- VR Senator LSx454 1960 Kombi (project) 1921 Nash Hot Rod (future project)
View build HERE
Posts: 5 777
I agree with Cava, either way you have work, either swapping the pedal assembly, or swapping the tb to cable. I would go cable.
April 13, 2015 at 9:59 pm #4687
RangaParticipant- Victoria
- 04 VYII Calais V8 97 Harley Fatboy
View build HERE
Posts: 22One thing to note and be mindful of when selecting an LS engine to be used in a conversion is what ECU/PCM you want to use in relation to what LS engine type you have/want, thats if you’re wanting to use a factory PCM.
The most common ECU/PCM to use for ease and simplicity is the P01 PCM found in VTII-VYII V8. These have the ability to run cable throttle bodies setups, where as the E38 found in late MY06 VZ-VF’s and E40 VZ HSV requires a Fly by Wire throttle body and pedal assembly to operate. There’s also the 5.7L VZ PCM (I’ve forgotten the code for) which basically is a P01 but with Fly by Wire operation.
Now LS engines come with 2 types of Crank/Cam triggers, 24X and 58X Crank reluctor wheels and Half moon and 4 Point Cam gears. The 24X Crank Reluctor is suited to Half moon Cam gears (LS1’s actually have this on the back of the camshaft with the sensor in the block) and is found in all VTII-VZ5.7 Engines and also VZ HSV 6L(these have the half moon cam gear and cam sensor in the timing cover), with VZ MY06 6l to VF running a 58X reluctor wheel and 4 Point Cam Gear(cam sensor in the timing cover).
From this basically, if you are running a P01 PCM you require the 24X and half moon setup and 58X and 4 point for E38’s.
This in no way means you are restricted in what engine you can use by picking a PCM, obviously the easiest thing to do would be transplant both the engine and PCM that was in the donor car into your project.
Say for instance though you’ve picked up a LS P01 wiring harness and computer cause you want to run a cable throttle body on the cheap and a 6L 0r 6.2L out of a VE SS or HSV has somehow managed to find you and your wallet for the right price; now the issue you have is that the P01 requires a 24X crank and cam signal, 2 options, Lingenfelter offer a plug in conversion harness that goes between the crank and cam sensors and the PCM converting the signal from the 58X to 24X so everything operates as normal, the other option is to remove the crank and get an engine shop to remove the 58X reluctor wheel and install a 24X reluctor wheel and change the Cam gear on the front from the 4 Point style trigger to a half moon style as found on VZ HSV 6Ls, from this the P01 will operate as normal thinking its controlling a standard 5.7, except for the benefit of having a 6/6.2 with a cable throttle body setup.Personally, I would pull the crank and swap the reluctor over as that way the engine is set up correctly mechanically to suit the P01 and you don’t have the extra hassle of trying to hide/neaten additional wiring with the conversion module, or the potential for electrical gremlins associated with extra modules.
I see the ultimate as using a P01 PCM, harness and Cable throttle running a VZ HSV 6L, as these are already setup with 24X setup, 6L capacity, 243 heads, correct sump if going into an earlier generation Commodore, good intake manifold and with the addition of a good quality 90mm Cable throttle, its happy days until the power bug bites you hard for more!
Hopefully this all makes sense, I’m falling asleep as I type, lol.
April 14, 2015 at 6:35 am #4725100% Correct Ranga. I was on the phone to Justin at Ulitmate Wiring Conversions last night going through this very topic regarding which loom and ecu is best to use for my conversion.
April 14, 2015 at 8:43 am #4729
RangaParticipant- Victoria
- 04 VYII Calais V8 97 Harley Fatboy
View build HERE
Posts: 22Justin at Ultimate is a very smart guy with electrical stuff!
At work we had a VX XU6 with a Single turbo 4.2 V6 Stroker on E85 etc. etc. (lot of money spent everywhere), and Justin had made a custom harness incorporating a P01 PCM in it, which made tuning it a breeze with our normal HP Tuners. Car made over 500rwkw all controlled by the P01.
April 14, 2015 at 9:41 am #4732Yeah mate. He gave me the ins and outs on what to do for my case. Said I got a couple options regarding the FBW. But in the end it’s cheaper to have that initial cost of the loom and computer rather then all the little costs later of changing this and that.
April 14, 2015 at 9:53 am #4733
VRSenator065Participant- Adelaide SA
- VR Senator LSx454 1960 Kombi (project) 1921 Nash Hot Rod (future project)
View build HERE
Posts: 5 777
^^^^ Great info Ranga, cheers. I used the Lingenfelter converter and so far it appears to work perfectly. But if/when the engine is ever out of the car I am going to change the reluctor wheel over, for the exact reason you said, more or less just one thing to go wrong, also they apparently can be problematic at very high rpm, although I am pulling 7k and it seems OK (so far).
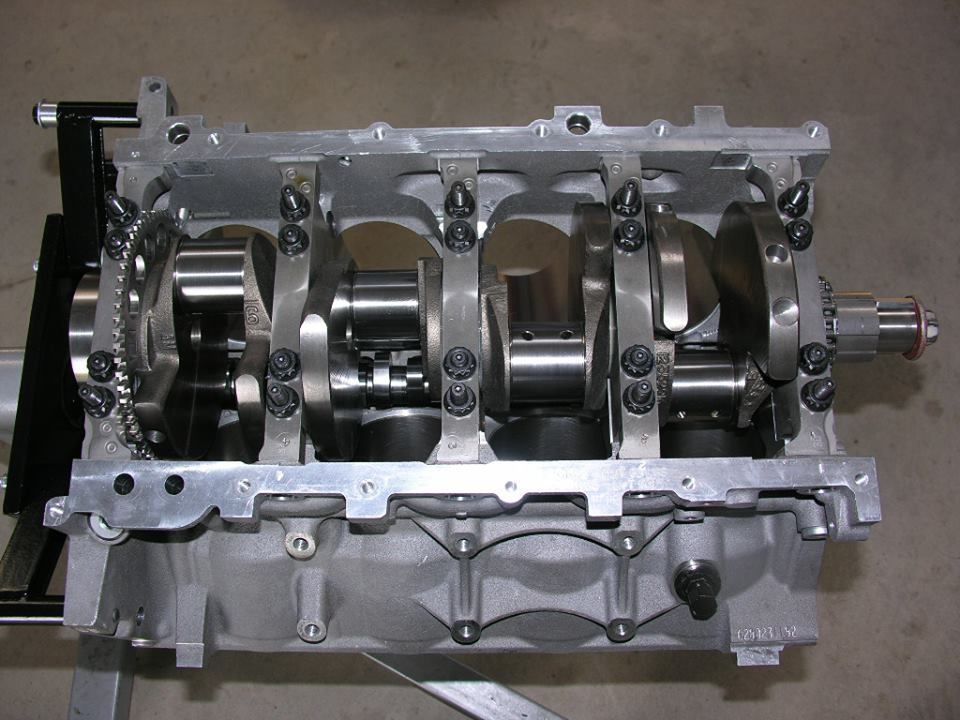
Btw thanks to fellow member IJ, here is a picture showing the reluctor wheel at the back of the crank on the left.
April 14, 2015 at 10:33 am #4737Bit of work to change the wheel. Just run the box. Don’t fix what ain’t broke
April 14, 2015 at 11:26 am #4744
VRSenator065Participant- Adelaide SA
- VR Senator LSx454 1960 Kombi (project) 1921 Nash Hot Rod (future project)
View build HERE
Posts: 5 777
Bit of work to change the wheel. Just run the box. Don’t fix what ain’t broke
A lot of wisdom in that saying…
April 14, 2015 at 4:52 pm #4800
RangaParticipant- Victoria
- 04 VYII Calais V8 97 Harley Fatboy
View build HERE
Posts: 22I’d agree to an extent, the early module were prone to being faulty, although they have dramatically improved in their quality and operation, and I have no issue with using them, I even sell them at work but I see it as a band-aid/quick fix on something that can be done properly.
Price isnt really a factor either, the module can range from 400-450 depending on the US dollar, and the 24x reluctor wheel and half moon is about $150 from memory, if you’re handy on the tools you can pull the crank out yourself and send it to the engine shop and get them to change it for a couple hundred.
6 one way, half dozen the other.
April 14, 2015 at 5:06 pm #4802I’d agree to an extent, the early module were prone to being faulty, although they have dramatically improved in their quality and operation, and I have no issue with using them, I even sell them at work but I see it as a band-aid/quick fix on something that can be done properly. Price isnt really a factor either, the module can range from 400-450 depending on the US dollar, and the 24x reluctor wheel and half moon is about $150 from memory, if you’re handy on the tools you can pull the crank out yourself and send it to the engine shop and get them to change it for a couple hundred. 6 one way, half dozen the other.
Here’s one I prepared earlier!


-
AuthorPosts
You must be logged in to reply to this topic.

