This topic contains 1,175 replies, has 48 voices, and was last updated by ![]() cava454 3 years, 2 months ago.
cava454 3 years, 2 months ago.
-
AuthorPosts
-
December 17, 2015 at 10:17 pm #12242

VRSenator065Participant- Adelaide SA
- VR Senator LSx454 1960 Kombi (project) 1921 Nash Hot Rod (future project)
View build HERE
Posts: 5 777
Bits are good, that is all.
December 17, 2015 at 11:57 pm #12246
MichaelParticipant- VY Calais 383ci GT42 turbo.
View build HERE
Posts: 208
Hopefully your CRS headers fit. I’ve got two mates doing a ls1 into a VL conversion using those size headers and one is having troubles fitting his drivers side and the other having troubles with his passenger side.
In saying that, my front end has arrived from them. So I hope I don’t have any dramas fitting that as well.
December 18, 2015 at 6:00 am #12247Hopefully your CRS headers fit. I’ve got two mates doing a ls1 into a VL conversion using those size headers and one is having troubles fitting his drivers side and the other having troubles with his passenger side. In saying that, my front end has arrived from them. So I hope I don’t have any dramas fitting that as well.
i actaully straight swapped them with a bloke who couldn’t fit them in his VK. I’ve got to repair them slightly where old owner “modified” with his hammer.
December 18, 2015 at 8:54 am #12248
VRSenator065Participant- Adelaide SA
- VR Senator LSx454 1960 Kombi (project) 1921 Nash Hot Rod (future project)
View build HERE
Posts: 5 777
I just fitted them to mine, they don’t hit at all (now). I used Tuff mounts though so bugger all engine movement. Def turn the chassis lip down about 45 degrees, they say that’s “preferable” but I think its a must. I needed to on the passenger side. The other trick is they come with the drivers side two pairs of pipes, slice them in the center of the flange into 4 individual pipes so you can feed them in better and also gives you the chance to move them slightly. The glide housing (Reid) I used is very chunky too so we had to grind some relief into the housing for clearance on the passenger side pipe that’s close to the bell housing. We also removed the bottom section of the starter swap plate, it hangs in the breeze anyway. We made up a bracket to support the starter that picks up on one of the rear sump bolts. On a glide its bloody tight around the gear selector which is quite low in the case so near the pipes. Depends on what cable you are running to it and the bracket it uses but we had to modify that also. We also used some heat proof tubing on the cable to give it some protection. Its tight, but putting an LS anything into one of these just is. I think I remember you saying your going manual rack? That will make it a little nicer on the drivers side. And imo def get them ceramic coated to at least try and keep the heat away from everything. At some stage when I have it up on the hoist I will take some pics and do a full write up on the conversion thread. Hope that helps.
-
This reply was modified 9 years ago by
 VRSenator065.
-
This reply was modified 9 years ago by
 VRSenator065.
December 18, 2015 at 9:00 am #12251
VRSenator065Participant- Adelaide SA
- VR Senator LSx454 1960 Kombi (project) 1921 Nash Hot Rod (future project)
View build HERE
Posts: 5 777
Sorry one other thing, for some reason they come with the O2 sensors on the outside of the collectors. It makes it a bitch to run the cable to them from the centre of the car to the sensor so it wont melt as it has to go over the pipes and there is little clearance. While they are out weld in new sensor bosses on the inside, will make it easier, and do that before you ceramic coat them. The pipes also sit very low, but I guess that wont matter as its primarily a race car but if you get checked for ride height (100mm) you will have to have the suspension up pretty high to pass.
December 18, 2015 at 9:20 am #12252Thumbs up for the help. Eagerly await the write up.
For or now I’m just getting everything in. Then I’ll rip out and paint. At this point I’ll ceramic coat and weld those bungs.
How did u split them into 4? The merge collector is welded.
December 18, 2015 at 9:39 am #12253
VRSenator065Participant- Adelaide SA
- VR Senator LSx454 1960 Kombi (project) 1921 Nash Hot Rod (future project)
View build HERE
Posts: 5 777
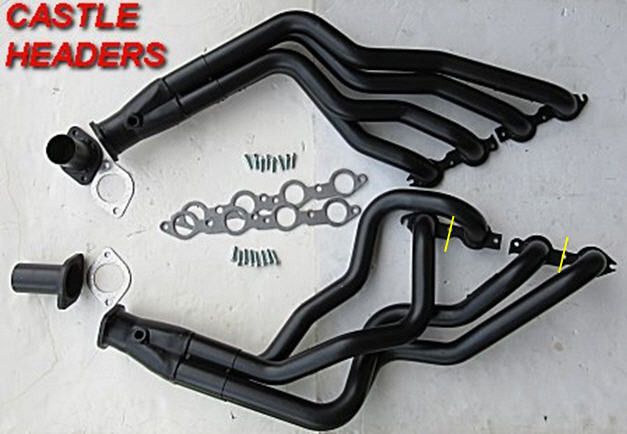
Collectors are slip on. The drivers side are a pair of two pipes with the header flange split in the middle. Slit the header flange again at the bolt hole on them so they are 4 separate pipes. Put each pipe in, do the bolts up snug but allowing a little movement, knock on the collector then tighten them up. Slit them here where the yellow marks are.
December 18, 2015 at 9:46 am #12254
VRSenator065Participant- Adelaide SA
- VR Senator LSx454 1960 Kombi (project) 1921 Nash Hot Rod (future project)
View build HERE
Posts: 5 777
And after all that looking (and reading more closely) you have CRS headers not CAE. Are they one piece, i.e. collectors welded, even on the drivers side around the steering shaft?
December 18, 2015 at 10:16 am #12256Yep. All welded no split etc. I may look into buying new collector and chopping these off, if fittment is a pita
December 18, 2015 at 10:25 am #12257
VRSenator065Participant- Adelaide SA
- VR Senator LSx454 1960 Kombi (project) 1921 Nash Hot Rod (future project)
View build HERE
Posts: 5 777
Interested to see how you go, everything I have ever read about CRS conversion headers are they are at best a pita. In fact have read more than one person give up and just bin them. So what you have to remove the rack every time to do anything? And the drivers side has to be fitted as one complete unit, good luck with that. Given everything else your doing and the $$ you are investing in this not sure that’s the best plan, your car of course, keep us posted, no doubt you will sort it.
December 18, 2015 at 5:21 pm #12262Ive got a mash hammer, oxy kit and a fuck load of duct tape.
I’ve got this.
 December 19, 2015 at 8:54 am #12263
VRSenator065Participant- Adelaide SA
- VR Senator LSx454 1960 Kombi (project) 1921 Nash Hot Rod (future project)
View build HERE
Posts: 5 777
And cable ties, you forgot cable ties….
December 19, 2015 at 4:02 pm #12281Bit of a disappointment today. Pulled the box apart.
I thought what the old owner told me was too good to be true. Considering it. Was dirt cheap.
Despite being freshened recently it’s not up to spec what I need. It’s originally from an Impala as evident by the extension housing as the output shaft.
Upon further notice the gear set is only a v6 item. The pump and the drum are re usable and in good nick however.
So gunna have to start looking into rebuilding the sucker. Deep down I knew this would be the case. Ahh well

 December 19, 2015 at 4:39 pm #12282
VRSenator065Participant- Adelaide SA
- VR Senator LSx454 1960 Kombi (project) 1921 Nash Hot Rod (future project)
View build HERE
Posts: 5 777
Far out how much does that pic show how simple a glide is, no wonder they are so strong, very little to go wrong. Post up pics of the rebuild, def interested to see how you go

-
This reply was modified 9 years ago by
 VRSenator065.
December 19, 2015 at 8:58 pm #12288There is still a lot too them. Esp once u unpack all the clutches and pull out the valve body and gear set etc.
Gunna have to chase up some parts and see what it’s going to cost me to build it.
December 20, 2015 at 1:22 am #12289Holly shit
i wreckin Iv Done 3rd gear sincro in my t56, I think I’ll need more tools to pull my box apart then what’s In your Pics above of your glide in pieces
vlave body’s can be tricky but the shaft and gears look really simple
for the price of a cheap second hand glide and its next use it was expected to find this and good to find it now rather then later
also so slip on collectors for the win, makes life so much easier, I’m sure I have a proper pain in the ass set of pipes for most people but with slip on collectors it’s easy as for me as I know there sequence to fit them
Oddley enough my first 2 pipes are harder to get in then the 6 that follow them as the first 2 need to go in together if that makes sense
December 20, 2015 at 6:16 am #12292I always had a feeling the box wasn’t what it was cracked up to be. Like I said, I paid less for it then you would to buy just a core. Which is now what I basically have.
A good mate of mine worked 10 + years in the trans industry for arguably one of the best in the business. PTC/ProMatic.
His steered me into somewhat of a direction on what I need to look out for. So I’m on the hunt.
I’ll give he headers a crack as is for the time being and see how I go. If not I’ll have to chop the collectors off and buy slip ons.
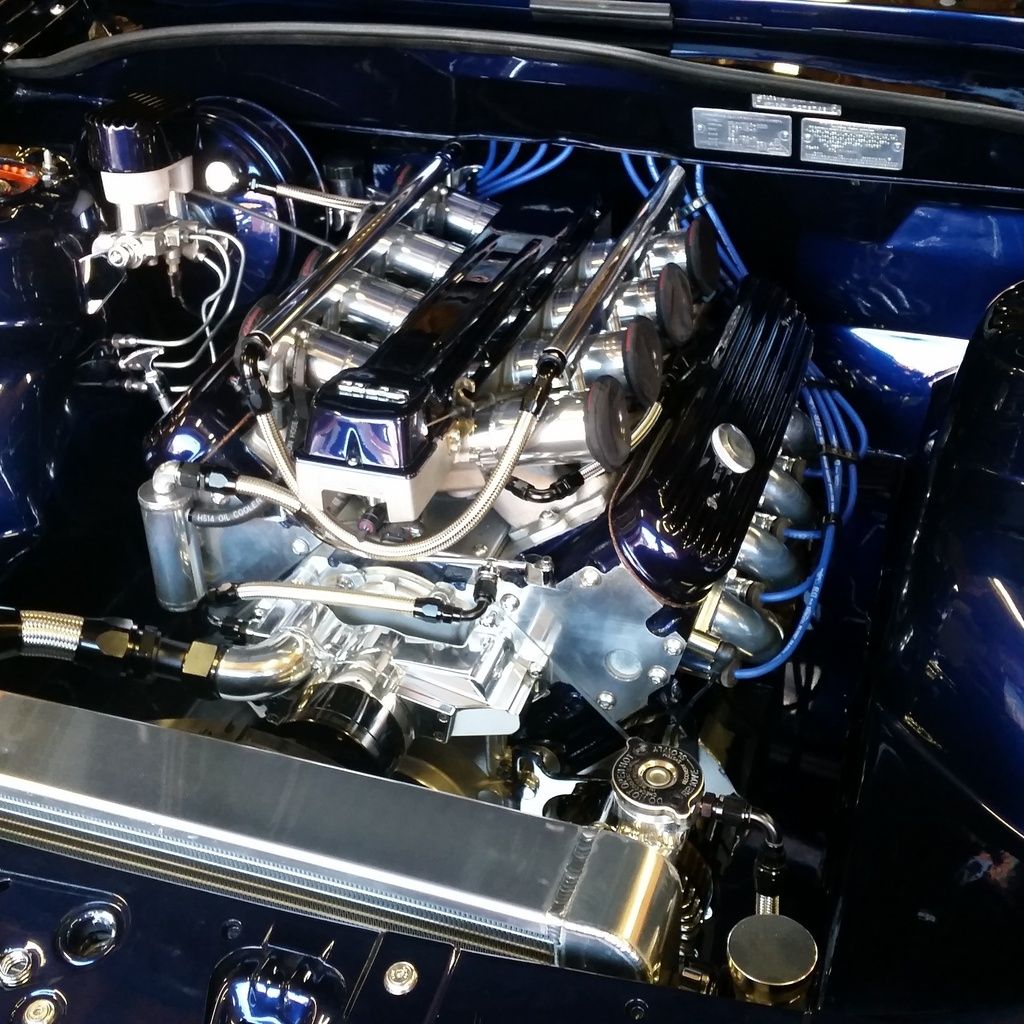
December 20, 2015 at 9:18 am #12293cav with your brake lines rather than using grommet and joiners behind why no use bulkhead fittings like i did sorry about the average pic couldnt find a better one

-
This reply was modified 9 years ago by
 capssy.
December 20, 2015 at 10:19 am #12297
VRSenator065Participant- Adelaide SA
- VR Senator LSx454 1960 Kombi (project) 1921 Nash Hot Rod (future project)
View build HERE
Posts: 5 777
….sorry about the average pic couldnt find a better one
yea right, bay porn…..
December 20, 2015 at 11:56 am #12298cav with your brake lines rather than using grommet and joiners behind why no use bulkhead fittings like i did sorry about the average pic couldnt find a better one

 all over it. I seen some of the brake lines done at my engineeres. He used bulk head nuts. Sold me on it straight away. Looks so much cleaner/professional then the grommet.
I excuse your shitty bay pick

-
AuthorPosts
You must be logged in to reply to this topic.


